
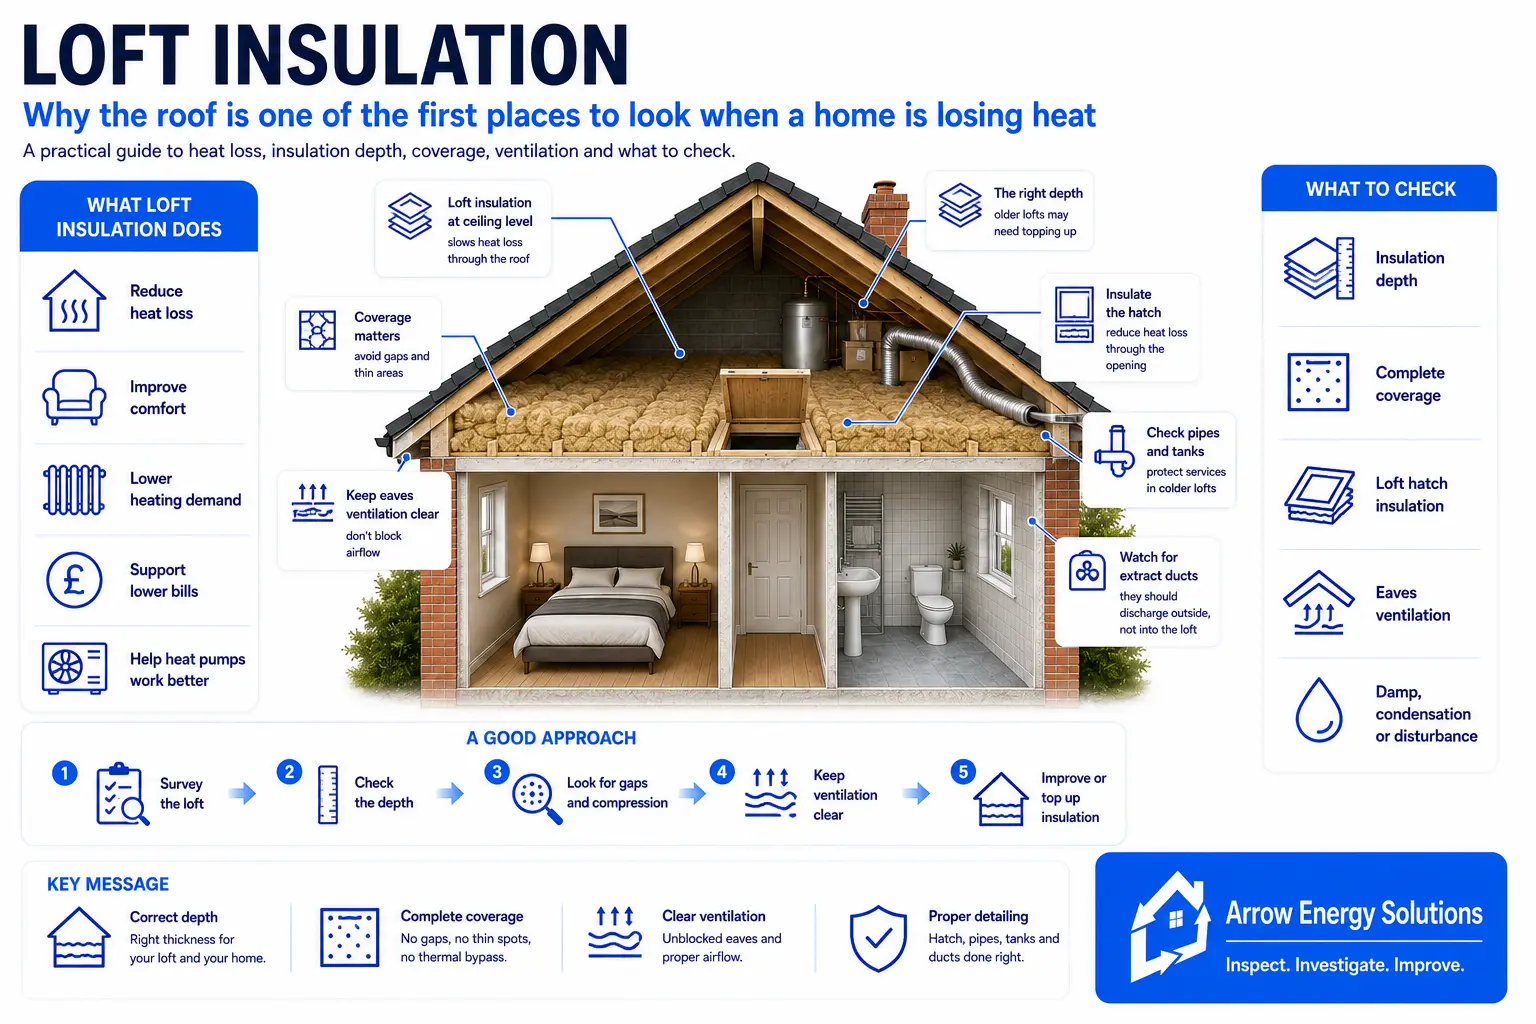
Heat naturally rises.
In an uninsulated or poorly insulated home, a significant amount of warmth can escape through the roof.
That is why loft insulation is often one of the simplest and most effective ways to improve the thermal performance of a property.
But good loft insulation is not just about having “some insulation” in the loft.
The depth, coverage, condition, ventilation and way it has been installed all matter.
A loft may appear insulated at first glance but still contain:
Thin areas
Gaps
Compressed insulation
Missing insulation around eaves
Poorly insulated loft hatches
Disturbed material
Damp or contaminated insulation
Understanding what is actually present is the first step.
Loft insulation slows the movement of heat from the rooms below into the colder roof space above.
The more effectively the insulation resists heat flow, the less energy is needed to maintain a comfortable temperature inside the home.
Good loft insulation can help:
Reduce heat loss
Improve comfort
Reduce heating demand
Lower energy use
Keep upstairs rooms warmer
Reduce cold ceilings
Support lower-energy heating systems
It is one of the key parts of a fabric-first approach to improving a home.
In a traditional cold-roof loft, insulation is usually installed at ceiling level between and over the ceiling joists.
This means the rooms below remain within the heated part of the building, while the loft space above stays relatively cold.
The insulation should ideally form a continuous layer across the ceiling plane.
If there are large gaps, heat will find those weaker areas.
Many older homes have significantly less loft insulation than would normally be installed today.
Older properties may contain:
No insulation at all
A very shallow layer
Around 50–100 mm
Older insulation added in stages
Modern top-ups laid over the original material
In many conventional mineral-wool loft installations, around 270 mm is commonly used as a modern reference depth.
However, the required thickness depends on the insulation product and its thermal conductivity.
Different products can achieve different levels of thermal resistance at different thicknesses.
So depth alone does not tell the whole story.
Imagine a loft with 300 mm of insulation across 90% of the floor.
That sounds good.
But if the remaining 10% contains large uninsulated areas, those gaps can become significant routes for heat loss.
Common problem areas include:
Eaves
Loft hatches
Around water tanks
Pipework
Electrical equipment
Tight corners
Areas under stored items
Previous access routes
Good installation means maintaining continuity wherever possible.
The eaves are where the roof slopes down towards the external walls.
This area needs particular care.
Insulation should extend far enough towards the edge of the building to avoid leaving a cold strip at ceiling level.
But it must not block ventilation routes where those routes are required.
This balance is important.
If insulation stops too far back, the edge of the ceiling may remain cold.
If insulation is pushed tightly into the eaves and blocks ventilation, moisture management within the roof space may be affected.
A cold roof space usually requires ventilation to help control moisture.
Warm air from the house can contain water vapour.
Some of that moisture may reach the loft.
If it is not properly managed, condensation can form on colder roof surfaces.
This may lead to:
Damp timbers
Mould
Condensation on roofing membranes
Corrosion
Damage to stored items
Good loft insulation and good ventilation therefore need to work together.
Possible signs include:
Condensation on the underside of the roof
Damp rafters
Black mould
Water droplets
Wet insulation
Musty smells
Staining
Rusting fixings
These symptoms should be investigated before simply adding more insulation.
Correctly installed loft insulation should not automatically cause condensation.
But increasing insulation changes the temperature within the loft.
The roof space above the insulation generally becomes colder because less heat escapes from the rooms below.
This makes effective ventilation and moisture control increasingly important.
Problems can occur where:
Ventilation is blocked
Moist indoor air enters the loft excessively
Extract fans discharge into the loft
Roof defects allow water in
Insulation is incorrectly installed
The correct solution is not to avoid insulation.
It is to make sure insulation, ventilation and moisture control are considered together.
A surprisingly common issue is an extract fan duct terminating inside the loft.
Warm, humid air from a bathroom or kitchen should not simply be discharged into the roof space.
The duct should normally discharge correctly to the outside.
If it vents into the loft, substantial moisture can accumulate.
This can sometimes be mistaken for a roofing or insulation problem.
The loft hatch is often overlooked.
A well-insulated ceiling with an uninsulated hatch creates an obvious weak point.
A good loft hatch should ideally be:
Insulated
Draught controlled
Properly fitted
Easy to close securely
Poorly sealed hatches can also allow warm, moisture-laden air to move into the loft.
Insulating a loft also changes the temperature around tanks and pipes.
Historically, escaping heat from the house helped keep some loft spaces relatively warm.
After insulation is improved, the loft may become significantly colder in winter.
Water tanks and pipework may therefore require appropriate insulation to protect against freezing.
The exact arrangement depends on the system in the property.
Yes, but boarding needs to be handled correctly.
A common problem occurs when homeowners lay boards directly onto ceiling joists and compress the insulation beneath them.
Compressed mineral wool generally does not perform as well as insulation installed at its intended thickness.
If a loft is to be used for storage, a raised boarding system may be more appropriate.
This allows insulation to remain at the required depth beneath the walkway or storage platform.
Mineral wool works partly by trapping air within its structure.
Compressing it reduces its effective thickness and can reduce its thermal resistance.
So a loft containing deep insulation that has been heavily flattened by storage may not perform as well as it appears.
Some homes have insulation installed between or beneath the rafters rather than at ceiling level.
This creates a different type of roof arrangement.
It is common in:
Loft conversions
Rooms in the roof
Some modern homes
Warm-roof construction
The ventilation, vapour control and insulation strategy can be very different from a conventional cold loft.
You should not automatically apply the same approach to both.
A converted loft is no longer simply a cold roof space.
The insulated envelope may run through:
Sloping ceilings
Dwarf walls
Flat ceiling sections
Dormers
These areas can contain hidden gaps and difficult junctions.
A loft conversion can therefore feel cold even when insulation is technically present.
If an upstairs room is particularly difficult to heat, the loft above it is worth checking.
Possible causes include:
Missing insulation
Thin insulation
Disturbed insulation
Gaps around eaves
Loft hatch leakage
Roof conversion defects
Poor insulation around dormers
This can sometimes explain why one bedroom is colder than another.
Older homes may have been upgraded several times.
You may find:
Older mineral wool below newer material
Different insulation depths in different areas
Insulation disturbed by rewiring
Historic tanks or pipework
Old loft boarding
Uninsulated extensions
A loft that looks well insulated from the access hatch may not be consistent throughout.
An extension may have a completely different roof construction from the original house.
For example:
The main house may have a traditional pitched loft
The extension may have a flat roof
A later addition may have insulation within the rafters
Each section should be considered separately.
Recessed downlights can complicate loft insulation.
Some fittings must maintain clearances from insulation, while others are designed to be covered when installed correctly.
The fitting type and manufacturer’s requirements should be checked.
Insulation should not simply be packed around electrical equipment without considering safety.
Heavy insulation around electrical cables can affect their ability to dissipate heat.
In some situations, cable sizing or routing may need consideration.
Where there is uncertainty, electrical work should be assessed by an appropriately competent person.
Hot flues and chimney components may require clearances from combustible insulation materials.
These areas should be identified before insulation work begins.
This links directly to the wider safety considerations around fireplaces, log burners and combustion appliances.
A good installation should generally be:
Evenly distributed
Continuous
At an appropriate thickness
Not heavily compressed
Properly detailed around the hatch
Kept clear of required ventilation routes
Correctly handled around services
Installed into a dry, suitable roof space
It should not simply be piled into the loft without regard for the rest of the building.
Common issues include:
Large gaps
Uneven thickness
Blocked eaves ventilation
Insulation over damp areas
Compressed insulation
Covered electrical equipment
Poorly insulated hatches
Extract ducts terminating in the loft
Missing insulation over extensions
Disturbed insulation after later building work
Not simply because it is old.
If existing insulation is dry, clean and performing correctly, it may often remain in place with additional insulation installed over it where appropriate.
Removal may be considered where insulation is:
Wet
Contaminated
Heavily damaged
Infested
Preventing necessary repairs
Unsuitable for the proposed work
The condition matters more than age alone.
Loft insulation is particularly important when considering a heat pump.
Heat pumps work best when the building has a relatively low heat demand.
Reducing heat loss through the roof can help reduce the amount of heat the system needs to provide.
That can support:
Lower running costs
Lower heating demand
Better comfort
More efficient system design
This is why insulation is often considered before or alongside a heat-pump installation.
Passivhaus takes this principle much further.
The roof forms part of a continuous, highly insulated thermal envelope.
The lesson for an ordinary home is still useful:
insulation works best when it is continuous and carefully detailed.
Adding depth helps.
Removing gaps and weak points matters too.
A basic visual inspection can tell you quite a lot.
Look for:
Insulation depth
Consistent coverage
Bare areas
Compressed sections
Damp or staining
Blocked eaves
Loft hatch insulation
Pipe insulation
Extract ducts
Signs of condensation
Do not walk directly on the ceiling between joists.
If safe access is not available, a professional inspection is preferable.
Arrow Energy Solutions provides loft insulation and insulation assessment services for homeowners, landlords, housing providers and commercial clients.
Our work can include:
Existing loft insulation assessment
Loft insulation top-ups
New loft insulation
Inspection of coverage and condition
Identification of obvious ventilation concerns
Photographic installation evidence
Handover documentation
Where a home is difficult to heat, loft insulation is often one of the first parts of the building fabric worth understanding.
If your loft insulation needs upgrading, find out more about our professional loft insulation installation service and arrange a free survey.
Loft insulation is relatively simple in principle.
Keep heat from escaping through the roof.
But good performance depends on more than simply adding another roll of insulation.
The best results come from getting the details right:
Correct depth. Complete coverage. Clear ventilation. Proper detailing.
A well-insulated loft can make a significant contribution to a warmer, more comfortable and more energy-efficient home.
Inspect. Understand. Improve.